一、目标
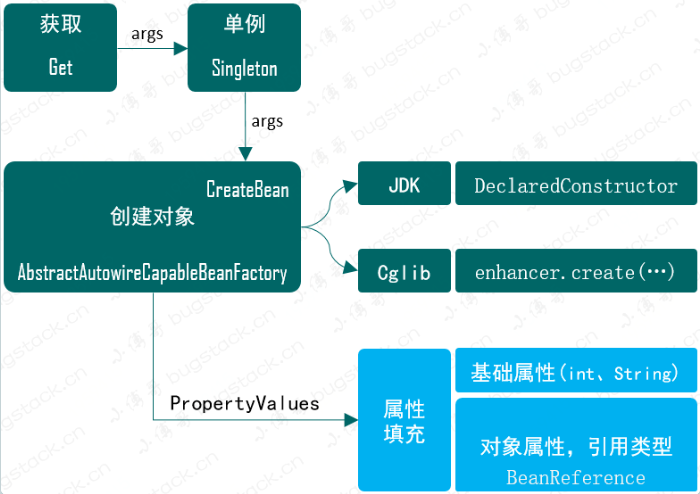
如果类中包含属性那么在实例化的时候,对于属性的填充不仅仅是int、Long、String,还包括还没有实例化的对象属性,都需要在Bean创建时进行填充操作。 暂时不会考虑Bean的循环依赖
二、设计
那么属性填充是在Bean使用newInstance或者Cglib创建之后,开始补全属性信息,那么就可以在类AbstractAutowireCapableBeanFactory的createBean方法中添加补全属性方法。

- 属性填充要在类实例化创建之后,那么就需要在
AbstractAutowireCapableBeanFactorycreateBean方法中添加applyPropertyValues操作。
- 由于我们需要在创建Bean的时候填充属性操作,那么就需要在bean定义BeanDefinition类中,添加PropertyValues信息。
- 另外是填充属性信息还包括了 Bean 的对象类型,需要再定义一个 BeanReference,里面其实就是一个简单的 Bean 名称,在具体的实例化操作时进行增量创建和填充,与 Spring 源码实现一样。 BeanReference源码是一个接口
三、实现
1、工程结构
1
2
3
4
5
6
7
8
9
10
11
12
13
14
15
16
17
18
19
20
21
22
23
24
25
26
27
28
29
30
| small-spring-step-04
└── src
├── main
│ └── java
│ └── cn.bugstack.springframework.beans
│ ├── factory
│ │ ├── factory
│ │ │ ├── BeanDefinition.java
│ │ │ ├── BeanReference.java
│ │ │ └── SingletonBeanRegistry.java
│ │ ├── support
│ │ │ ├── AbstractAutowireCapableBeanFactory.java
│ │ │ ├── AbstractBeanFactory.java
│ │ │ ├── BeanDefinitionRegistry.java
│ │ │ ├── CglibSubclassingInstantiationStrategy.java
│ │ │ ├── DefaultListableBeanFactory.java
│ │ │ ├── DefaultSingletonBeanRegistry.java
│ │ │ ├── InstantiationStrategy.java
│ │ │ └── SimpleInstantiationStrategy.java
│ │ └── BeanFactory.java
│ ├── BeansException.java
│ ├── PropertyValue.java
│ └── PropertyValues.java
└── test
└── java
└── cn.bugstack.springframework.test
├── bean
│ ├── UserDao.java
│ └── UserService.java
└── ApiTest.java
|
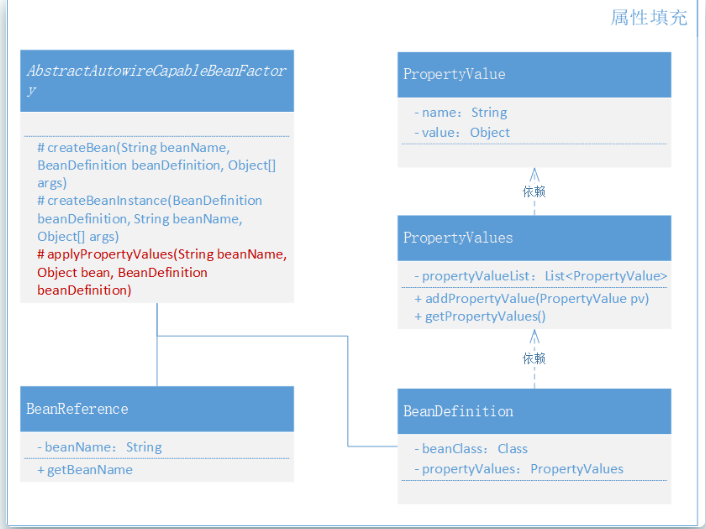
Spring Bean 容器类关系,如图 5-2

- 本章节中需要新增3个类,
BeanReference(类引用)、PropertyValue(属性值)、PropertyValues(属性集合),分别用于类和其他类型属性填充操作。
- 另外的类主要是
AbstractAutowireCapableBeanFactory,在 createBean 中补全属性填充部分。
2. 定义属性
cn.bugstack.springframework.beans.PropertyValue
1
2
3
4
5
6
7
8
9
10
11
12
13
| public class PropertyValue {
private final String name;
private final Object value;
public PropertyValue(String name, Object value) {
this.name = name;
this.value = value;
}
}
|
cn.bugstack.springframework.beans.PropertyValues
1
2
3
4
5
6
7
8
9
10
11
12
13
14
15
16
17
18
19
20
21
22
| public class PropertyValues {
private final List<PropertyValue> propertyValueList = new ArrayList<>();
public void addPropertyValue(PropertyValue pv) {
this.propertyValueList.add(pv);
}
public PropertyValue[] getPropertyValues() {
return this.propertyValueList.toArray(new PropertyValue[0]);
}
public PropertyValue getPropertyValue(String propertyName) {
for (PropertyValue pv : this.propertyValueList) {
if (pv.getName().equals(propertyName)) {
return pv;
}
}
return null;
}
}
|
- 这个类的作用就是创建出两个用于传递类中属性信息的类,因为属性可能会有很多,所以还需要定义一个集合包装下。
3. 豆类定义补全
cn.bugstack.springframework.beans.factory.config.BeanDefinition
1
2
3
4
5
6
7
8
9
10
11
12
13
14
15
16
17
18
| public class BeanDefinition {
private Class beanClass;
private PropertyValues propertyValues;
public BeanDefinition(Class beanClass) {
this.beanClass = beanClass;
this.propertyValues = new PropertyValues();
}
public BeanDefinition(Class beanClass, PropertyValues propertyValues) {
this.beanClass = beanClass;
this.propertyValues = propertyValues != null ? propertyValues : new PropertyValues();
}
}
|
- 在Bean注册的过程中是需要传递Bean的信息,在前面几个章节的测试中都有所说明
new BeanDefinition(UserService.class, propertyValues);
- 所以为了把属性确定替换Bean定义,所以这里填充了PropertyValues属性,同时把两个构造函数做了一些简单的优化,避免后面进行循环时还得判断属性填充是否为空。
4.Bean属性填充
cn.bugstack.springframework.beans.factory.support.AbstractAutowireCapableBeanFactory
1
2
3
4
5
6
7
8
9
10
11
12
13
14
15
16
17
18
19
20
21
22
23
24
25
26
27
28
29
30
31
32
33
34
35
36
37
38
39
40
41
42
43
44
45
46
47
48
49
50
51
52
53
54
55
56
57
58
59
60
61
62
63
64
65
| public abstract class AbstractAutowireCapableBeanFactory extends AbstractBeanFactory {
private InstantiationStrategy instantiationStrategy = new CglibSubclassingInstantiationStrategy();
@Override
protected Object createBean(String beanName, BeanDefinition beanDefinition, Object[] args) throws BeansException {
Object bean = null;
try {
bean = createBeanInstance(beanDefinition, beanName, args);
applyPropertyValues(beanName, bean, beanDefinition);
} catch (Exception e) {
throw new BeansException("Instantiation of bean failed", e);
}
addSingleton(beanName, bean);
return bean;
}
protected Object createBeanInstance(BeanDefinition beanDefinition, String beanName, Object[] args) {
Constructor constructorToUse = null;
Class<?> beanClass = beanDefinition.getBeanClass();
Constructor<?>[] declaredConstructors = beanClass.getDeclaredConstructors();
for (Constructor ctor : declaredConstructors) {
if (null != args && ctor.getParameterTypes().length == args.length) {
constructorToUse = ctor;
break;
}
}
return getInstantiationStrategy().instantiate(beanDefinition, beanName, constructorToUse, args);
}
protected void applyPropertyValues(String beanName, Object bean, BeanDefinition beanDefinition) {
try {
PropertyValues propertyValues = beanDefinition.getPropertyValues();
for (PropertyValue propertyValue : propertyValues.getPropertyValues()) {
String name = propertyValue.getName();
Object value = propertyValue.getValue();
if (value instanceof BeanReference) {
BeanReference beanReference = (BeanReference) value;
value = getBean(beanReference.getBeanName());
}
BeanUtil.setFieldValue(bean, name, value);
}
} catch (Exception e) {
throw new BeansException("Error setting property values:" + beanName);
}
}
public InstantiationStrategy getInstantiationStrategy() {
return instantiationStrategy;
}
public void setInstantiationStrategy(InstantiationStrategy instantiationStrategy) {
this.instantiationStrategy = instantiationStrategy;
}
}
|
- 这类的内容有点长,主要包括三个方法:createBean、createBeanInstance、applyPropertyValues,这里我们主要关注 createBean 的方法中调用的 applyPropertyValues 方法。
- 在 applyPropertyValues 中,通过获取
beanDefinition.getPropertyValues()循环进行属性填充操作,如果遇到的是 BeanReference,那么就需要递归获取 Bean 实例,调用 getBean 方法。
- 当把完成依赖的Bean对象创建后,会递归现在属性填充中。这里需要注意我们并没有去处理循环依赖的问题,这部分内容增加,后续补充。BeanUtil.setFieldValue(bean, name, value)是hutool-all工具类中的方法,你也可以自己实现
五、测试
1. 事前准备
cn.bugstack.springframework.test.bean.UserDao
1
2
3
4
5
6
7
8
9
10
11
12
13
14
15
| public class UserDao {
private static Map<String, String> hashMap = new HashMap<>();
static {
hashMap.put("10001", "小傅哥");
hashMap.put("10002", "八杯水");
hashMap.put("10003", "阿毛");
}
public String queryUserName(String uId) {
return hashMap.get(uId);
}
}
|
cn.bugstack.springframework.test.bean.UserService
1
2
3
4
5
6
7
8
9
10
11
12
| public class UserService {
private String uId;
private UserDao userDao;
public void queryUserInfo() {
System.out.println("查询用户信息:" + userDao.queryUserName(uId));
}
}
|
- Dao、Service,是我们平时开发经常使用的场景。在 UserService 中注入 UserDao,这样就能体现出Bean属性的依赖了。
2. 测试示例
1
2
3
4
5
6
7
8
9
10
11
12
13
14
15
16
17
18
19
20
21
| @Test
public void test_BeanFactory() {
DefaultListableBeanFactory beanFactory = new DefaultListableBeanFactory();
beanFactory.registerBeanDefinition("userDao", new BeanDefinition(UserDao.class));
PropertyValues propertyValues = new PropertyValues();
propertyValues.addPropertyValue(new PropertyValue("uId", "10001"));
propertyValues.addPropertyValue(new PropertyValue("userDao",new BeanReference("userDao")));
BeanDefinition beanDefinition = new BeanDefinition(UserService.class, propertyValues);
beanFactory.registerBeanDefinition("userService", beanDefinition);
UserService userService = (UserService) beanFactory.getBean("userService");
userService.queryUserInfo();
}
|
- 与直接获取 Bean 对象不同,这个时候我们还需要先把 userDao 注入到 Bean 容器中。
beanFactory.registerBeanDefinition("userDao", new BeanDefinition(UserDao.class));
- 接下来就是属性填充的操作了,一种是普通属性
new PropertyValue("uId", "10001"),另外一种是对象属性new PropertyValue("userDao",new BeanReference("userDao"))
- 接下来的操作就简单了,只不过是正常获取 userService 对象,调用方法即可。
3. 测试结果
1
2
3
| 查询用户信息:小傅哥
Process finished with exit code 0
|
[文章引用]: https://mp.weixin.qq.com/s?__biz=MzIxMDAwMDAxMw==&mid=2650730594&idx=1&sn=6c02c7a188f847db1c249d732f088dd3&chksm=8f611180b8169896f607a0d1a135e11090a8386c9a4ef024560c63100460dd3781a2d9e236e2&cur_album_id=1871634116341743621&scene=189#wechat_redirect “《Spring手撸专栏》第5章:一鸣惊人,为Bean对象注入属性和依赖Bean的功能实现”

